Thursday, April 18, 2013

How To Remove Error and Locked Blogger Widgets

Unremovable widget is a very common problem of Blogger users. You may encounter this problem when you change your template and some widgets of this new template is unremovable. Some unremovable do not affect your template at all, it will not appear in your blog page, but they are still annoying  when you manage your widgets.
Locked Widget and Normal Widget
There is two kinds of unremovable widgets. The first is "error widget", which is not show any option when you edit it. The second is "locked widget", which can not move to anywhere and do not have Remove button when you edit it (such as Navigation and Attribution widget). This post will show you how to remove these kinds of widgets in very easy step.

STEP 1: 

You need to know what is widgetID of this unremovable widget. Go to Layout, click Edit corresponding to this widget. At popup window, look for widgetID at the end of URL bar, select and copy it.
Select and copy widgetID

Friday, April 12, 2013

How To Expand Widget Templates in New HTML Editor?

After new Blogger Template HTML Editor was out, I received a lot of questions about the old "Expand Widget Templates". In this post, we will make it clear about Expand Widget Templates in new HTML Editor.

What Is Expand Widget Template


For who don't know, Expand Widget Template is a option of old HTML Editor. By default, the old editor only show core template code and hide others code like widget. It makes you easier to edit or customize Blogger Template. All widget code will only show if you check Expand Widget Templates option.
Expand Widget Templates Option

Where Is Expand Widget Templates


Well, in current HTML Editor, there will be no option Expand Widget Templates anymore. Why? Because all codes have been shown in new editor, that's mean you don't need to expand it anymore.
By default, all widget code have been folded. A concealed widget code section is identified by a fold marker, it's is an arrow symbol , next to the line number. You click into it, and the concealed widget code section is revealed.
Click Right Arrow Icon To Expand Widget Code

How To Expand Widget In New HTML Editor


At the time, almost Blogger tips or tutorials are still within the old editor, so how to follow their instruction about "Expand Widget Templates"?

Search For Specific Section

If the tutorial requires you to find for a section of code, use Find function (Ctrl F) and find for it. If this section of code is in folded widget section, the concealed widget code will automatically expand.

Go To A Widget Code

If the tutorial requires you to find a widget code, use Jump to widget feature to quickly locate it. After that, click to expand this widget code before editing.
Jump to widget feature

Wednesday, April 10, 2013

New Blogger Template HTML Editor With Many Improvements!

As you know, editing and customizing Blogger Template with HTML editor is like a nightmare with anyone who is not familiar with coding. Just because the old HTML editor is just like a Notepad program without anything to help the users. No syntax highlighter, no line counter, no everything, just a white page with thousand lines of code.

New Blogger Template HTML Editor is OUT!


But it's not like that anymore! The new Blogger Template HTML Editor has come out with many many improvements as a press release from Blogger Buzz. This is the best Blogger update I've ever heard and I have waited for this for several years! Okay, enough with introduction, let's find out.

What's New In New Blogger Template HTML Editor?
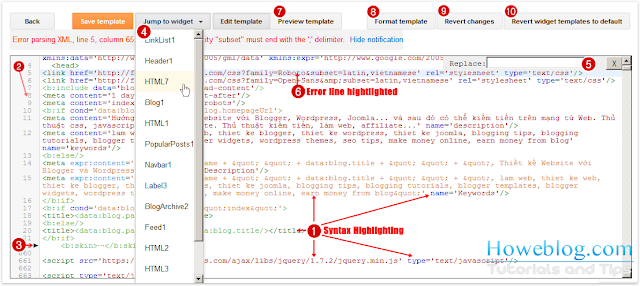
What's New In New Blogger Template HTML Editor

1. Syntax Highlighter

The first thing I can notice from the new editor is syntax highlighter. What is that? Syntax Highligting is a feature of code editor that display code in different colors (and fonts) according to the category of terms. It will help you easier to spot a part of code. It's also support auto-indentation to match code's structure.

2. Line Counter

Like before, everytime you make a error in code, it was very hard to find where is the error line. With source code line counter, it's will much easier.

3. No More Widget Expand, Replace With Code Folding

There is no Expand Widget Template anymore, it is Code Folding instead. When editing template, you will see some character at the counter column, click on it and all code of this section will be expanded. After expanding code, the will disappear, but if you click at where the symbol disappear you can fold the code again.

There will be each for every widget code, you need to click every to expand all widgets code.
For more information, read How To Expand Widget Templates in new HTML Editor.

4. Jump To Widget

With this function, you can easily locate any widget html code in template without using search. 

5. Find, Find and Replace, Replace All

Now, everytime you press Ctrl + F, there is a build-in find function of HTML Editor. If you still wanna use Browser Find function, press Ctrl F again or press F3. But I recommend using the build-in one, because it will hight light all matched word, not only one. And to Find Next, press Ctrl G.
For Replace function, press Ctrl Shift F, input what's need to replace then Enter, input what's you wanna replace with and Enter again.
Replace All helps you replace all word at once, press Ctrl Shift R and use like Replace.

6. Error Highlighter

Not just error notification like old editor, the new editor also highlights the line of code with error. If there is more than one error, the first error will be notified and highlighted.

7. Preview Template

Preview your website without Saving the template

8. Format Template

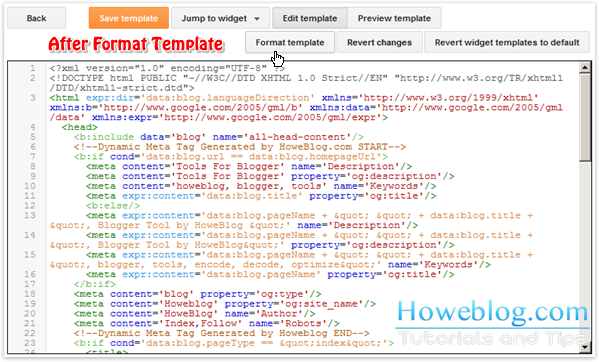
Format Template button will automatically cleans up the indentation of the template. That's will make your code friendlier.
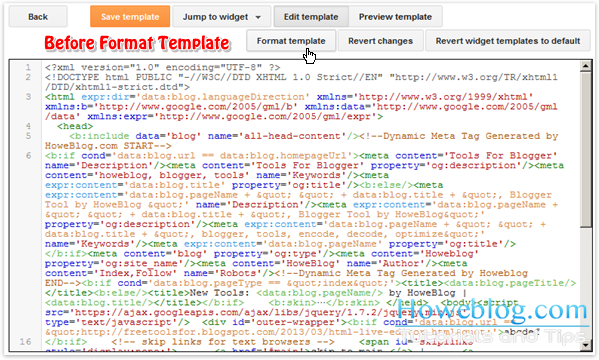
Before Using Format Template
After Using Format Template

9. Revert Changes

No need to refresh all page anymore, just click Revert Changes.

10. Revert Widget Template

Revert Widget value to default. Reverting a widget to its default value will remove any customizations you have made inside the <b:widget> tag.

How Can You Use That?


This improvements have been applied to every Blogger, not ony Blogger in Drafts. With someone who new with Blogger or coding, maybe this change is a little bit confused. The only way is try to get used to it.

How About Howeblog

This is really a big change and affect to all older tips. Don't worry, every tips still work fine with this new editor but few step may a bit different since old editor has been replaced. And I think there is no way to roll back to the old editor.
I will try to edit old post to suitable with this new editor. After that, I will write some tips about using it, please stay tune. Peace!

Saturday, April 6, 2013

Add Dynamic Meta Tag To Blogger For Best SEO

Meta Tag in Blogger


Meta tags, especially description tag and keyword tag, are the most important tag for SEO in Blogger. Meta tags allow search engine spider crawl and index your website more accurately. In other words, meta tags tell the search engine what your website about and how they display your page in search result pages.
Beside description and keywords meta tag, you can use some other tags help for SEO like robots tag, author tags, open graph tag:
  • Description and Keywords: provide information of your page.
  • Author: tell everybody author of this post.
  • Robots: tell the search engine spider how to treat your page. You can't prevent the spider from crawling and indexing your page and many other thing.
  • Open Graph: mark by property attribute with og value like og:title, og:type, og:site_name etc. This tag is used by Facebook to display your blog exactly.
Meta Tag Robots, Author and Open Graph

Using Meta Tag Description and Keywords in Blogger

There are 2 ways to adding meta tag description and keywords to Blogger, by Settings and by HTML Editor. Please read Blogger How 4 - SEO Techniques for Blogger for complete information about using meta tag.

About Dynamic Meta Tag

What is Dynamic Meta Tag

If you ever used Wordpress, you would notice that some wordpress SEO plugins always have a dynamic meta tag function. It will generate a different tag for each post, not just the same keywords or description like default Blogger Meta tag.
Where do the different tags come from? The plugins will get description and keywords from post title, labels (tags, categories) and some words from post content. Some Wordpress plugins support this function are SEO Ultimate, All-in-one SEO Pack, Wordpress SEO by Yoast.

Why Dynamic?

Well, with the default meta tag, every page of your blog will have the same tag. That's mean the search engine can not clearly know about your page content, and will treat all page the same way. That's called "duplicate meta tag"and definitely not good for SEO.

Dynamic Meta Tag Generator 1.2 for Blogger/Blogspot


Dynamic Meta Tag Generator by HoweBlog helps you generate dynamic tag for Blogger/Blogspot with your desire keywords. There are some advantages:
  • Getting keywords and description from your post title.
  • Use your owd keywords along with auto keywords.
  • Support dynamic meta tag for every page of Blogger.
  • Support open graph meta tag use for social media network such as Facebook.
  • Easy to use.

How To Use

  1. Go to Howeblog > Tools > Dynamic Meta Generator
  2. Fill in all fields to make the tool work properly. Author and Robots is optional. You can use the same description and keywords at Homepage and Post page.
    Using Dynamic Meta Tag Generator
    Using Dynamic Meta Tag Generator
  3. Click Generate Meta Tag to get the code, then select all and copy this.
  4. Backup your template, then go to your blog Dashboard > Template > Edit HTML.
  5. Find 
    <b:include data='blog' name='all-head-content'/>
  6. Paste the code copied in step 3. If there is already have old meta tag, then replace them with the new one. You should replace old meta description, meta keywords, meta og, meta robots and meta author. If you still keep old meta tag, the lower position tag will be used.
    Replace old meta tag with the new one
    Replace old meta tag with the new one
  7. Save your template and you're done.
After these step, please go to your blog and check meta tag at some pages to make sure everything work fine. For error report, please comment at this post, I will reply in 24h.

Friday, April 5, 2013

Customize Default Blogger Title for Better SEO

Blogger is a very SEO-friendly platform, everything from url, script are optimized for search engine, except the title.

The default Blogger title


The default blogger title is so not friendly with users as well as search engine. Why? Because default blogger title likes to display main title first, and post title after. Since the SERP (search engine result page) only display a certain amount of words of title, displaying main title first may cut off some important keywords from your post title. And with readers, they can not completely understand your post if the title do not display entirely.

Customize Default Blogger Title
For a real-life example, my main title is Howeblog - Tutorials and Tips, and this is how Blogger displays my title:
Homepage: Howeblog - Tutorials and Tips
Post Page: Howeblog - Tutorials and Tips: My Post Title
Static Page: Howeblog - Tutorials and Tips: My Page Title
Search Page and Archive Page: by default, search engine spiders do not index these kinds of page, so we can skip it.
So, if you wanna improve your blog ranking, you must change default title into a better form, and then customize it for your taste.

Blogger Title Tag


There is 3 kind of blogger title tags you need to know.
  1. Data:blog.title: the title of the blog. E.g.: HoweBlog - Tutorials and Tips.
  2. Data:blog.pageTitle: the title of current page, this is default tag using in blogger. At homepage, it's the blog title; at post pages, static pages, it contains post title and page title below blog title. You can see from the example above.
  3. Data:blog.pageName: the title of each page, best title tag so far. It's the post title, page title, label name (if at label page). Note: at homepage, it shows nothing.

Customize Blogger Title


At first, remember back up your template, then you need to find where the default title tag located. Go to your blog Dashboard > Template > Edit HTML (don't tick Expand Widget Templates), then find this tag:
<title><data:blog.pageTitle/></title>
Some custom templates have changed the default title already, so obviously you can't find this tag and don't need to change it again. But if you still want to see how it looks, try search for:
<title><data:
Okay, to change your blog title, you need to replace entire of these tags (<title></title> with default Blogger template or <b:if></b:if> with custom template), you can choose one of the following title types below:

1. Only Post Title

Replace title tag with:
<b:if cond='data:blog.pageType == &quot;index&quot;'>
<title><data:blog.pageTitle/></title>
<b:else/>
<title><data:blog.pageName/></title>
</b:if>
With these tags, Blogger will show blog title at homepage, and only post title at post page, also apply for static page, archive page and label page.

2. Post Title and Page Title (Recommended):

Replace title tag with:
<b:if cond='data:blog.pageType == &quot;index&quot;'>
<title><data:blog.pageTitle/></title>
<b:else/>
<title><data:blog.pageName/> | <data:blog.title/></title>
</b:if>
At post page it will show title first and then blog title, also apply for static page, archive page and label page. E.g. "Customize Blogger Title | Howeblog - Tutorials and Tips".
Tips: you can replace | character with another one like ~, -, /, \.
This structure of title is widely used by Google, Yahoo, Youtube and others websites.

3. Customize Title with Custom Keyword

Not just post title, you can customize it with adding some keywords in title. It will show in SERP as a part of post title automatically every post. You can add your keyword before or after data:blog tag, but inside title tag. For example:

With Type 1:

<b:if cond='data:blog.pageType == &quot;index&quot;'>
<title><data:blog.pageTitle/> - Homepage keywords</title>
<b:else/>
<title>Case Study: <data:blog.pageName/> - Post keywords</title>
</b:if>
Blogger Title Customized

With type 2:

<b:if cond='data:blog.pageType == &quot;index&quot;'>
<title><data:blog.pageTitle/></title>
<b:else/>
<title>Best Tips: <data:blog.pageName/> from <data:blog.title/></title>
</b:if>

Saturday, March 30, 2013

How To Install Javascript SDK for Faster Facebook Integration

I'm sure many of you already know about Facebook Social Plugins (FSP) like Facebook Like Button, Facebook Recommendation, Facebook Comments etc. They serve as a good source of traffic since Facebook users share and post your blog into their wall. To install these plugins to Blogger or Wordpress, you will be asked for something called Javascript SDK.

What is Javascript SDK


The real name of Javascript SDK is Facebook SDK for Javascript. To make it simple, it helps you install and use any Facebook Social Plugins with a few lines of code. For example:
To install Facebook like button without Javascript SDK, use this code:
<iframe src="//www.facebook.com/plugins/likebox.php?href=http%3A%2F%2Fwww.facebook.com%2Fplatform&amp;width=292&amp;height=590&amp;show_faces=true&amp;colorscheme=light&amp;stream=true&amp;border_color&amp;header=true&amp;appId=136654566362129" scrolling="no" frameborder="0" style="border:none; overflow:hidden; width:292px; height:590px;" allowTransparency="true"></iframe>
But with Javascript SDK installed, you just need:
<fb:like-box href="http://www.facebook.com/platform" width="292" show_faces="true" stream="true" header="true"></fb:like-box>
Really cool, right?

Do I Need To Install Javascript SDK For Every Facebook Plugins?

Absolutely not! You only need to install it once.
If you read tutorials about installing FSP to blog, every post contains some steps like "Create Facebook Application", "Adding Code" ("code" means Javascript SDK). Or when you install a plugins from Facebook Developers, the first step is always "Include the Javascript SDK". That does not mean you must install Javascript SDK everytime, you just need to do it once.
Follow this post, and you can skip these steps forever from now on.

How To Install Javascript SDK

1. Create a Facebook Application

Facebook Application helps you manage and track your plugin. This also help you add more Administrator to manage plugin (especially for Facebook Comment) and more. Every Facebook Application comes with an App ID. When you provide this ID, it enables Facebook's Open Graph Meta Tags, which let you administer Facebook Pages for products (where you can share product updates and engage with customers who have "Liked" a product), and use Facebook Insights to track key metrics.

When creating a new Facebook Application, we are not really building an actual app, we just need a App ID. Providing an App ID for use with the Social Widgets feature is recommended, but optional, so you can skip this step.
Something you need to know about Facebook AppID:
  • You can use one AppID for multiple blogs.
  • Some plugins will not work without Facebook App.
  • Not all of the Facebook plugin need an App ID for installation code.
  • Some plugins need a particular AppID to work properly, that's mean you need to create a new Facebook App for the blog which uses that plugin.
Okay, let's do it:
  1. Go to Facebook Apps Developer and Login. Then click Create New App.
    Create New Facebook App
    Create New Facebook App

Thursday, March 21, 2013

Feedburner Subscriber Went To Zero, Again!

Yesterday (20th March 2013), as I noticed, the count number of Feedburner Subscriber is turned to zero instead showing the correct number. And if you login to Feedburner Dashboard, you will see all channel subscriber have gone zero. The Feed Stats Dashboard also show 0 Subscriber with 0 Reachability.

Not only today!

Look at image below, it has happened before. In 19th Feb 2013 and 8th March 2013, the feed count number had turned to zero for two days. So, it seems the Feedburner service is not as stable as before.
 The Feed Stats Dashboard also show 0 Subscriber with 0 Reachability
The Feed Stats Dashboard also show 0 Subscriber with 0 Reachability

Wednesday, March 20, 2013

Stylish Breadcrumbs For Blogger With Multi Label Support

Breadcrumbs is a navigation element used in user interfaces, in this case is for website. It helps users to know their current location in a website. Breadcrumbs for website often appears below title bars or menu navigations bars with links back to each category the current post is in.
Breadcrumbs for Blogger with vBB style
Blogger post is located in Labels, not Categories and Blogger does not support multi level categories yet, breadcrumb is sure not available too. At this tutorial I will guide you how to add breadcrumbs for blogger with these advantages:

Pros:
  • Support Google Rich Snippet (you can test at Webmaster Rich Snippet Tool)
  • Support multi label breadcrumb
  • Breadcrumbs for label page
  • Style and compatible (even support IE)
  • Highly optimized and customize.

Breadcrumbs for Blogger is supported and display in Google SERP

Sunday, February 10, 2013

Blogger How 6 - Spread Your Blog With Social Network

Blogger How is Blogger Tutorial Series from How We Blog. In this series, I will guide you step by step building your first blog with Blogger, spread it to the world, and then you can earn money from it.
Part 6 of this series:

Blogger How 6 - Spread Your Blog Around The World With Social Network


After building a completely blog with great contents, you still need a few steps more to success. The question is how can you get as much visitors as possible. The answer content and SEO is not enough. An important part of Blogging Marketing Strategy is Social Media Network Marketing.
Social Network
Social Network

Thursday, January 10, 2013

Blogger How 5 - Add Widgets and Hacks To Template

Blogger How is Blogger Tutorial Series from How We Blog. In this series, I will guide you step by step building your first blog with Blogger, spread it to the world, and then you can earn money from it.

Part 5 of this series:

Blogger How 5 - Add Widgets and Hacks To Template


What is a Widgets?


At first, we need to know what widget is. Widgets, default name in Blogger is Gadget, enable bloggers to add more features, functions and anything they want to their blog in an easy way. A blog widget is created to be used with blogging platform like Wordpress, Typepad, Tumblr. Blogger currently supports many widgets which Google calls Gadgets.
A Blogger Widget
A Blogger Widget